
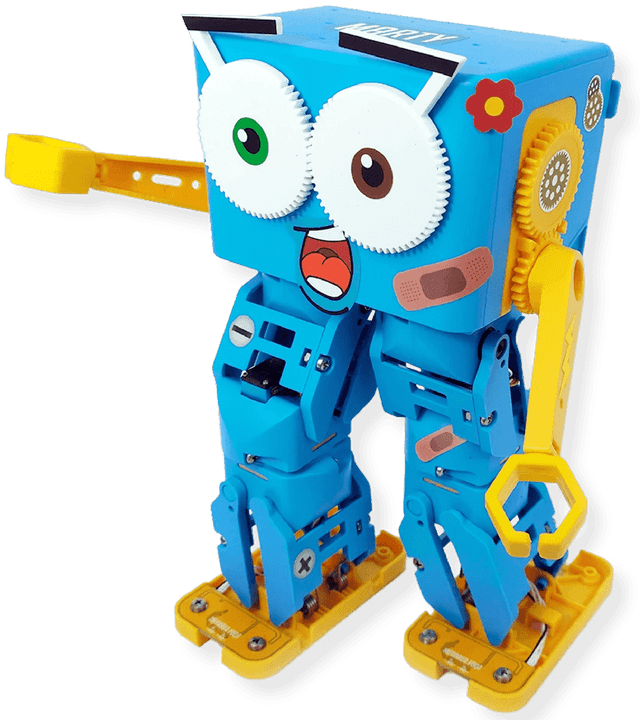

Maryu, the Street fighter marty
Introduction
Using Python, you will create a program that will transform your Marty into Maryu, the Street Fighter Marty, extending it to use the attacks and taunts that you want.
The video above is an example of what you can make your Street Fighter Marty do.
What you will need
- Marty the Robot
- A Raspberry Pi with an SD card
- A computer (additionally a monitor/TV with an HDMI cable, keyboard, and mouse to connect to the Raspberry Pi for convenience)
- A Joy-Con or any other Bluetooth controller (USB controllers can be used as well!)
What will you learn about?
- The beauty of executing your program via your Raspberry Pi to connect and make your Joy-Con control your Maryu
- Scanning IP addresses, manually connecting a Bluetooth device to your Raspberry Pi
- Configuring your Raspberry Pi to connect to a Wi-Fi network without using an HDMI cable
- Transforming your polite, civil Marty into a fierce street fighter!
extra information for educators
N/A
Setting up the raspberry pi
Before we even start the programming part of the activity, we need to set up the environment via Raspberry Pi.
First, download and install an SD Memory Card Formatter on your computer to format your SD card based on your Operating System, for example,
https://www.sdcard.org/downloads/formatter/
Download the Raspbian ZIP file for your Raspberry Pi (also simplified to Pi when referred to) via,
https://www.raspberrypi.org/downloads/raspbian/
and follow the installation guide via,
https://www.raspberrypi.org/documentation/installation/installing-images/README.md.
Following this, there are two ways of booting your Pi. Without using a HDMI cable and running it on your computer via VNC Viewer, or by using a HDMI cable with a monitor, keyboard and mouse, which would be an easier alternative.
booting raspberry pi without hdmi cable
First ensure your Pi is powered with the SD card in the SD card slot (with Rasbian installed). You will now boot your Pi for the first time without a HDMI cable!
The following video will guide you through the process of booting your Raspberry Pi,
https://www.youtube.com/watch?v=zBD7t5eWCoY
You can get the IP address of the Raspberry Pi using Angry IP Scanner after connecting your Pi to your Wi-Fi network as shown in the video above. Make sure your computer and Pi are connected to the same Wi-Fi network. You can ssh into your Pi via Terminal by running the command,
$ ssh pi@<insert IP address here>
The default Pi password is ‘raspberry’ and the connection to your Pi can be closed using the next command,
$ exit
You should now be able to connect to your Pi via VNC Viewer as shown in the previous video. When booting up the Raspberry Pi for the first time, you will be guided on connecting to your Wi-Fi network and you will be requested to update the software on your Raspberry Pi.
To make sure the packages on your Pi are up to date, ssh into your Pi via Terminal or by connecting to your Pi via the VNC Viewer, and then run the following commands via Terminal (it is the third icon to the right after the Raspberry Pi icon on the top left corner when using VNC Viewer),
$ sudo apt-get update
$ sudo apt-get upgrade
You are now set up to progress with the activity!
booting raspberry pi with a hdmi cable (easier!)
Booting your Pi for the first time with a HDMI cable is a very simple and straightforward process.
Make sure your Pi is powered with the SD card in (with Rasbian installed) and make sure it is connected to a monitor/TV via the HDMI cable and connect the peripherals (keyboard and mouse) via the USB ports.
The Pi should boot immediately when powered, and this will be visible when connected.
You will be guided on connecting to your Wi-Fi network and you will be requested to update the software on your Raspberry Pi. To make sure the packages on your Pi are up to date, open Terminal (it is the third icon to the right after the Raspberry Pi icon on the top left corner), and run the following commands,
$ sudo apt-get update
$ sudo apt-get upgrade
Brilliant! You are now all set to progress with the activity!
installing relevant packages
After making sure the existing packages on the Pi are up to date, you need to check what version of python and pip is on the Pi.
Python is the programming language used to do this activity and pip is used to install and manage software packages written in Python.
We can check what version we have via Terminal by running the commands,
$ python --version
$ pip --version
This should return the version installed for Python 2 and pip is used to support Python 2.
Similarly, the commands below should return the version for Python 3,
$ python3 --version
$ pip3 --version
Pip should be on the Pi by default but in the case that it is not, the command below will install it,
$ sudo apt-get install python-pip
The command below is used to compile python extension modules and bluez is used to connect Bluetooth or USB peripherals/controllers (like our Joy-Cons) to the Pi.
$ sudo apt-get install python-dev
$ sudo apt-get install bluez
You may now choose to program the activity using Python 2 or Python 3. Python 3 is more to date/current.
The commands to install the libraries to connect and communicate with the Joy-Con (evdev) and Marty (martypy) are below.
Commands for Python 2:
$ sudo pip install evdev
$ sudo pip install martypy
Commands for Python 3:
$ sudo pip3 install evdev
$ sudo pip3 install martypy
What is a Python library?
A Python library is a set of pre-written code or methods that someone else has written that we can directly use! They are used a lot to save time because instead of rewriting lots of different algorithms of programs all the time, we can import these algorithms for us to immediately use!
connecting the joy-con
Before programming the activity to control the Marty with the Joy-Con, it is insightful to connect the Joy-Con to the Pi and get the event code to identify the buttons that are pressed and to assign values/actions to them.
To connect the Joy-Con via Bluetooth, click on the Bluetooth icon on the top right (next to the Wi-Fi icon), turn it on and select ‘Add device’.
Note: The Joy-Con will not be displayed as an option to connect to because you need to press and hold the tiny silicone button next to the lights on the side until the lights start flashing.
The Joy-Con should then appear as an option to connect to. Select it and there should then be a green tick next to Joy-Con.
If the Joy-Con fails to be connected to the Pi, you can manually trust, pair and connect to the Joy-Con by running the following sequence of commands,
(XX:XX:XX:XX:XX:XX is the device ID in hexadecimal)
1 2 3 4 5 6 7 8 9 10 11 12 13 14 15 16 17 18 19 20 21 22 23 24 25 26 27$ sudo bluetoothctl [bluetooth]# power on [bluetooth]# agent on [bluetooth]# default-agent [bluetooth]# scan on [NEW] Device XX:XX:XX:XX:XX:XX Joy-Con(L) [bluetooth]# scan off [bluetooth]# trust XX:XX:XX:XX:XX:XX [bluetooth]# pair XX:XX:XX:XX:XX:XX Attempting to pair with XX:XX:XX:XX:XX:XX [CHG] Device XX:XX:XX:XX:XX:XX Connected: yes [CHG] Device XX:XX:XX:XX:XX:XX UUIDs: ... [CHG] Device XX:XX:XX:XX:XX:XX UUIDs: ... [CHG] Device XX:XX:XX:XX:XX:XX UUIDs: ... [CHG] Device XX:XX:XX:XX:XX:XX UUIDs: ... [CHG] Device XX:XX:XX:XX:XX:XX UUIDs: ... [CHG] Device XX:XX:XX:XX:XX:XX UUIDs: ... [CHG] Device XX:XX:XX:XX:XX:XX UUIDs: ... [CHG] Device XX:XX:XX:XX:XX:XX UUIDs: ... [CHG] Device XX:XX:XX:XX:XX:XX Paired: yes Pairing successful [CHG] Device XX:XX:XX:XX:XX:XX Connected: no [bluetooth]# connect XX:XX:XX:XX:XX:XX Attempting to connect to XX:XX:XX:XX:XX:XX [CHG] Device XX:XX:XX:XX:XX:XX Connected: yes Connection successful [bluetooth]# quit
Monitoring connectivity of Bluetooth devices can be seen once running the command below.
This can be down in a separate Terminal Window/Tab whilst connecting the Joy-Con manually (if preferred)
$ sudo btmon -w pair.bts
Now your Joy-Con is connected to the Pi, the following commands display the event codes and values to identify which buttons are pressed on the Joy-Con, for Python 2 and Python 3, respectively,
$ python /usr/local/lib/python2.7/dist-packages/evdev/evtest.py
$ python3 /usr/local/lib/python3.7/dist-packages/evdev/evtest.py
Knowing the number the Joy-Con is referred to by is important for the Python script that we will be coding and running in a bit!
A similar guide to this can be followed,
https://core-electronics.com.au/tutorials/using-usb-and-bluetooth-controllers-with-python.html
Note: Your Joy-Con may disconnect when not in use, simply press and hold the tiny silicone button next to the lights on the side until the lights start flashing and then try re-connecting to it.
Setting up marty files
Before you run the command via terminal to download the files to control Marty, first make sure you are in the right directory!
To check which directory you are currently in, run the command below,
$ ls
It should return and display names of folders.
Desktop should be among the names and we recommend downloading the file when you are in the Desktop directory.
Changing to the Desktop directory can be done by running the command below,
$cd Desktop
The files to control Marty can then be downloaded via the following command,
$ sudo git clone git@github.com:robotical/martypy.git
You will see the folder on the home screen once you have run the command.
If you want to go back to your previous directory, then run the following command,
$ cd ..
Putting it together
Since you can now connect your Joy-Con to the Pi and connect your Marty to the Pi, we are going to focus on the Marty being controlled by the Joy-Con via the Pi.
We already know the event codes for the Joy-Con buttons and we know what event number the Joy-Con is to manually make it communicate with Marty. This was done in the CONNECTING THE JOY-CON section.
Information on API referencing for the Joy-Con events can be accessed,
https://python-evdev.readthedocs.io/en/latest/apidoc.html
There are examples on how event codes and event values can be used to identify button/key pressed and actions can be assigned when the buttons/keys are pressed.
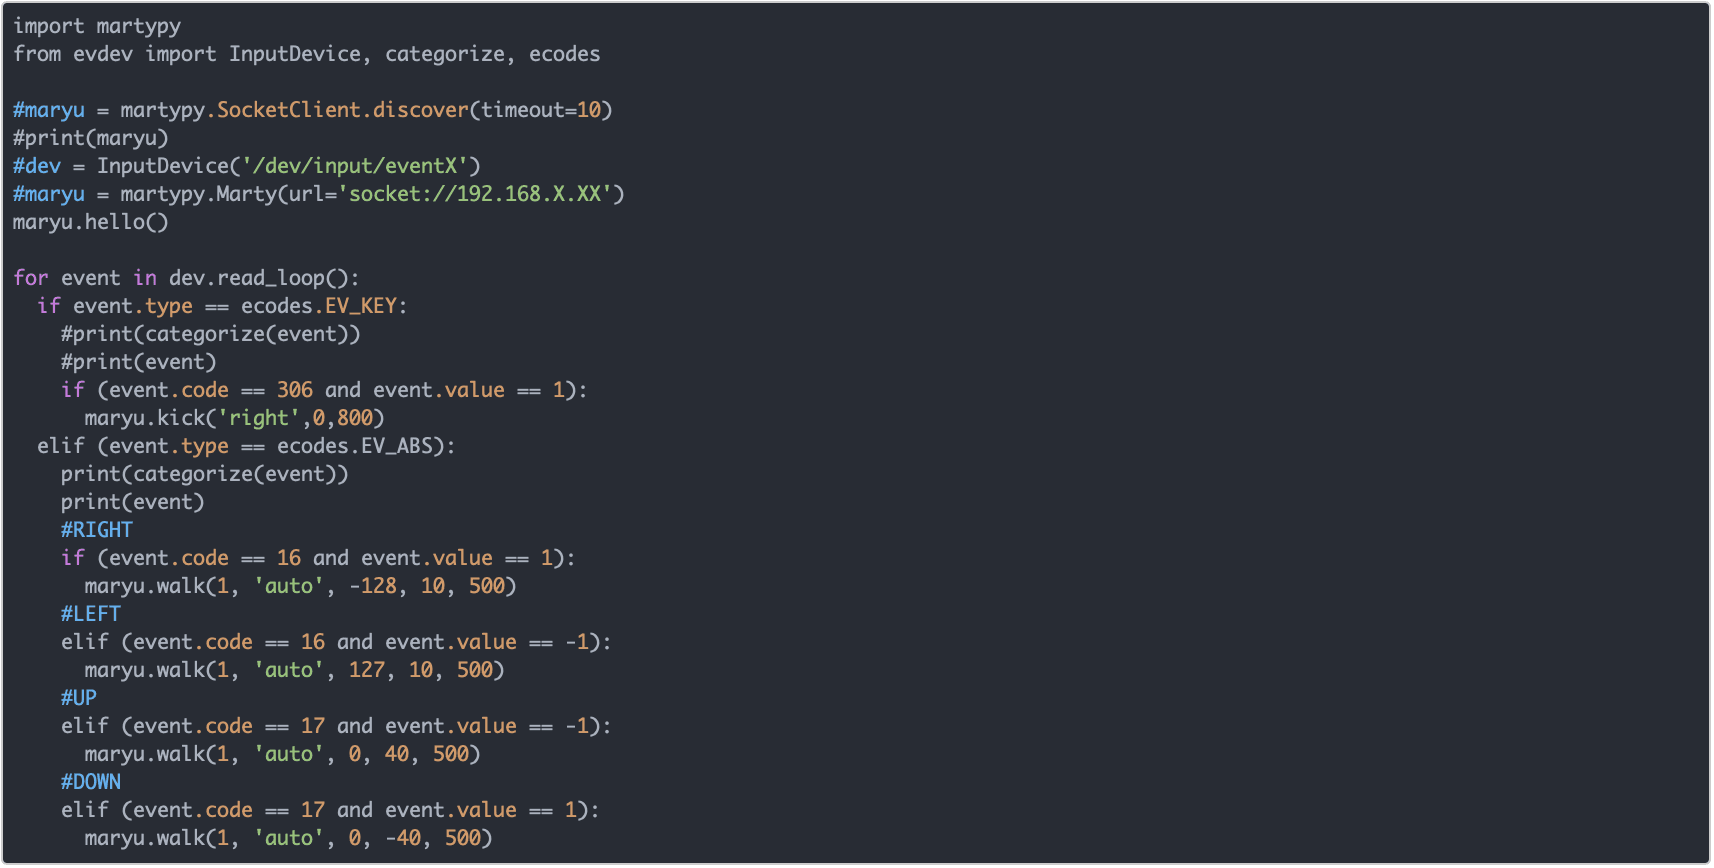
1 2 3 4 5 6 7 8 9 10 11 12 13import martypy from evdev import InputDevice, categorize, ecodes #maryu = martypy.SocketClient.discover(timeout=10) #print(maryu) dev = InputDevice('/dev/input/eventX’) maryu = martypy.Marty(url='socket://192.168.X.XX’) maryu.hello() for event in dev.read_loop(): if event.type == ecodes.EV_KEY: if (event.code == 306 and event.value == 1): maryu.kick('right',0,800)
We use a for loop to check whenever a button is pressed on the Joy-Con.
In this example, the Left Joy-Con was used and the for loop checked when one of the directional buttons was pressed and when it was pressed, Maryu would kick!
When using evtest.py to get the event codes and event values, you will notices that there are different event types too. When running the activity file, if you want to print out the event codes and event values of buttons pressed based on the event type, simple run the two lines below after the if condition of the event type!
print(categorize(event))
print(event)
What is a for loop?
Loops are used whilst programming to repeat certain actions or tasks multiple times. When using a for loop, we can define exactly how many times the actions inside it will be repeated. In our example above, our loop will keep running for each of the different events that are being read!
Challenge: move maryu using the stick on the joy-con
Program your Maryu to move using the stick on the Joy-Con!
Should your fighter turn left or right when controlled to do so, or should your fighter side-step in the direction he is instructed to?
Get the event codes and values for the stick on the Joy-Con and then assign actions for your Maryu to perform when the stick is moved!
NEED SOME HELP?
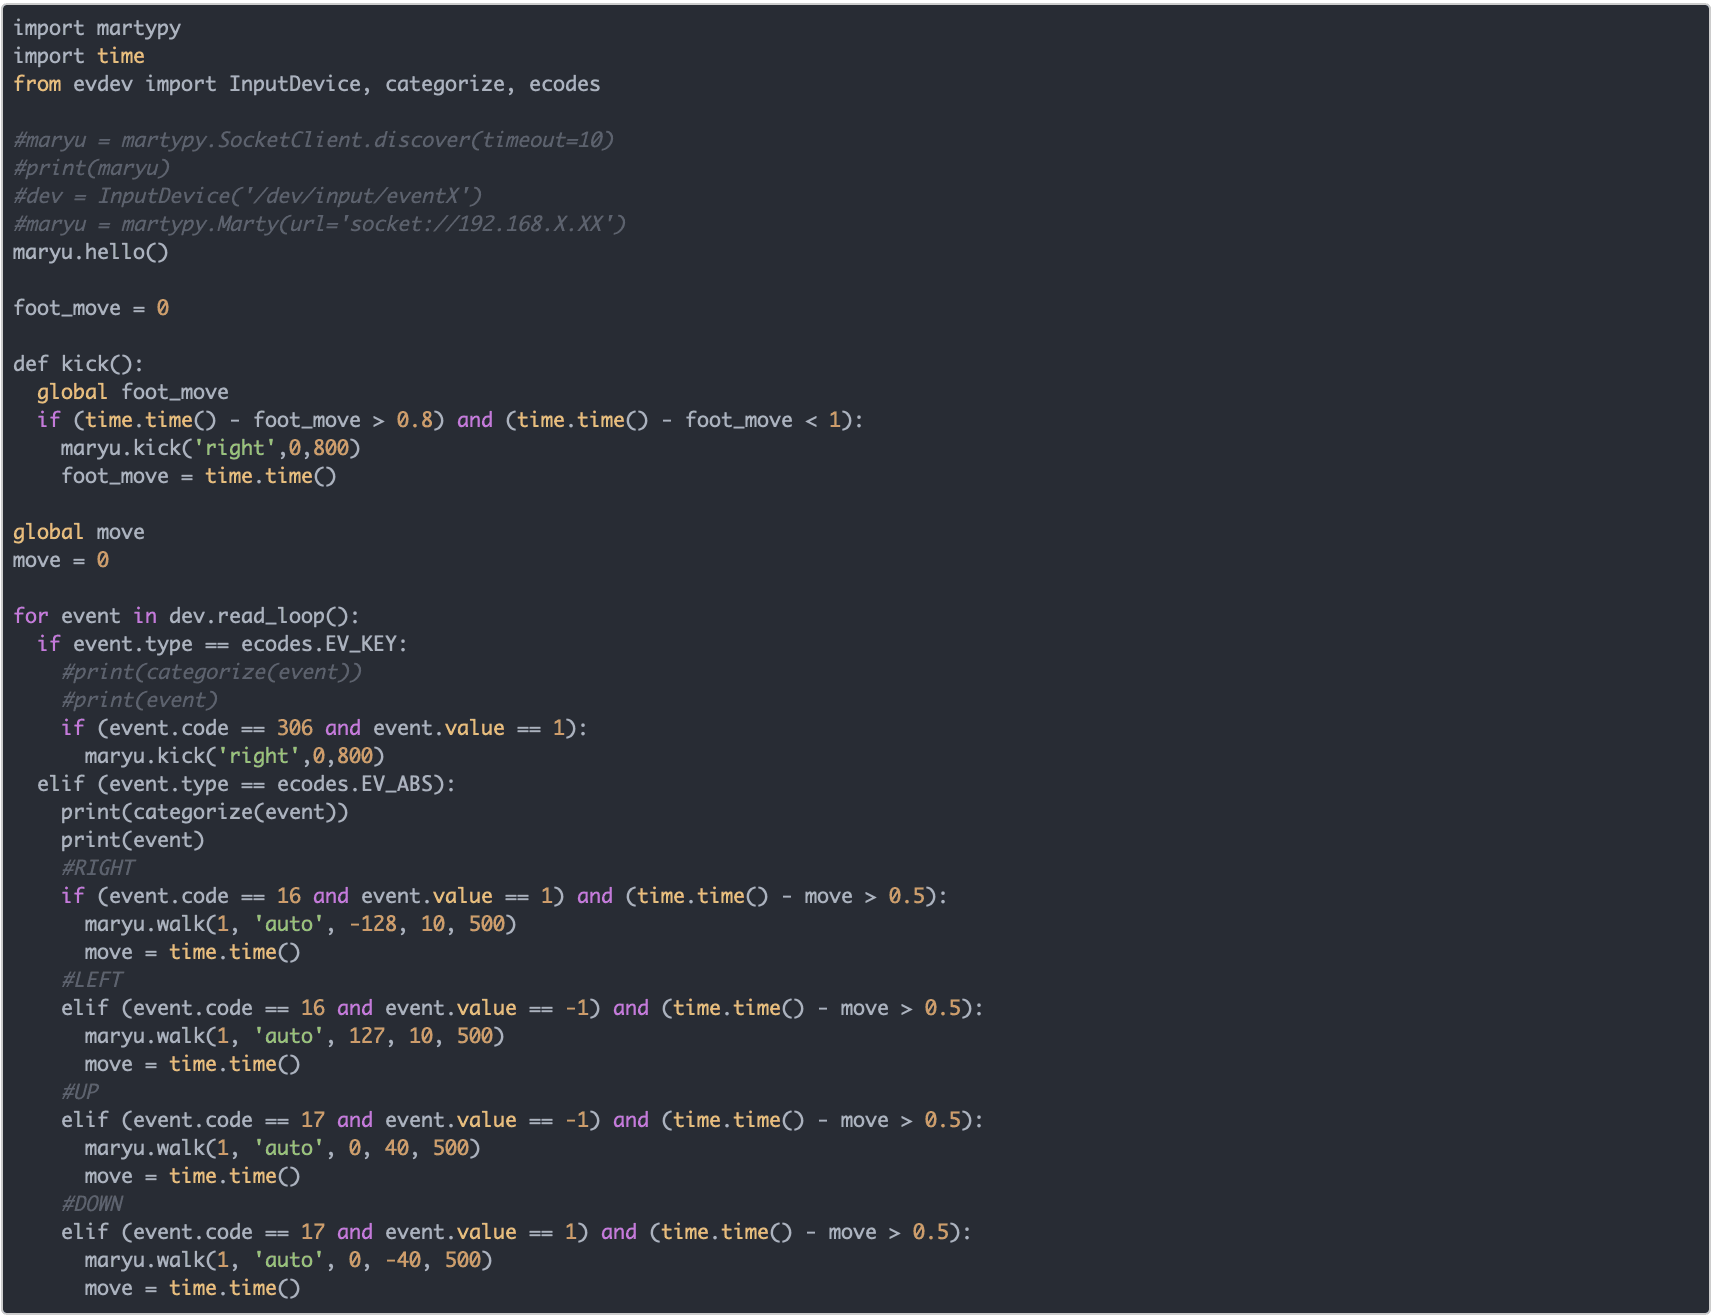
Challenge: fix the button smashing
Fix the spamming of buttons! As you would have noticed by now, when you keep on pressing and releasing a button, Maryu will continue to do his action even after you stop pressing anymore buttons.
We need to fix this. We do not want a glitchy fighter who lags! This is a major weakness our fighter has and any opponent can easily see it!
We can use a timer to fix this. It is a bit tricky but there is a Python library called time, we can use this to only allow Maryu to attack after a certain amount of time is passed because the action will only be triggered after the time has passed.
Note: Setting the threshold time entirely depends on you, the Fighting Master, but ideally it should be a bit longer than the time it takes for your fighter to do his move!
NEED SOME HELP?
reset for maryu
By now, you will have realised that it would be more ideal to have a reset button when testing out some actions on your Maryu.
Below is a function specially to reset your fighter's posture so he can continue fighting!
Simply call the function; i.e. reset() when the button is pressed!
def reset():
marty.enable_motors()
marty.enable_safeties()
marty.stop('clear and zero')
marty.enable_safeties(False)
marty.motor_protection(False)
What Next?
Switch it up! What interesting moves can you make your Street Fighter Marty do?
- Add combos to your Maryu's punches and kicks! Should the combos be specific sequences or should it be random?
- Train your fighter to learn unique moves! Can he do a roundhouse kick?
- What facial expression will your fighter have? Does he taunt his opponent or does he have any dances he performs after each of his victorious battles?