

2.24: Marty Bingo and Micro:Bit Events
Lesson Overview
We will explore a new way of programming Marty through interacting with the BBC Micro:Bit – a micro controller that has been built to help introduce physical computing and coding to young people. In this lesson, students will be experimenting with some of the different functionalities that the Micro:Bit has on offer to see how they can then use Marty and the Micro:Bit together.
- Micro:Bit, If Statements, Events, Input, Output, ip address,
Content Sections
2.24: Marty Bingo and Micro:Bit Events
Lesson Overview
We will explore a new way of programming Marty through interacting with the BBC Micro:Bit – a micro controller that has been built to help introduce physical computing and coding to young people. In this lesson, students will be experimenting with some of the different functionalities that the Micro:Bit has on offer to see how they can then use Marty and the Micro:Bit together.
- Micro:Bit, If Statements, Events, Input, Output, ip address,
- Experience with the Micro:bit and experience with browser-based applications
- Laptop or PC, with Wi-Fi (for Marty) and Bluetooth (for the micro:bit)
-
- Marty the Robot
- Marty Workbook
- Laptops/Computers with a Scratch Link installed
- Access to the Marty Blocks editor via a web browser
- BBC Micro:Bit
Learning Objectives
- Describe the way in which different pieces of hardware interact.
- Write code that is executed via a physical device.
Warm up
Ask learners to tell you what they remember about the Micro:Bit: what can it do; what does it show; how can we interact with it; how can we code with it? Record responses on the board. Answers may include using the MakeCode environment on the micro:bit website, which is good to remember. It is hoped that learners will suggest a range of ways that a user can interact with the micro:bit to elicit a response: using one or both buttons, shaking or tilting the device; additionally, the LED display can be utilised as a visual representation of the code.
Share with learners the first four presentation slides - the title, objectives, success criteria and video showing examples of input and output, in order to prepare them for the activities in today's lesson. Stopping the video at about 54 seconds, so that they won't hear the suggestions for the micro:bit.
Take this time to have learners discuss what they have done with a micro:bit in the past: challenges, successes, interesting points of learning. Ask them how they think they might use a micro:bit together with Marty and ask how coding a micro:bit might make interacting with Marty easier. Suggestions might include, I won't need to keep using the keyboard for the commands, everything will be stored in the micro:bit's program. Highlight that the micro:bit will be the input and Marty will be the output: we use the micro:bit to control Marty, much like the controller in the Marty app or the color cards are input for Marty; Marty's actions or noises are the output. Ask learners to suggest other input and output pairs they can remember from past learning. Playing the video from 54 seconds will let learners know about the variety of input and output devices that are built into their micro:bit; some of the accessories are only available on certain models, as detailed in the video.
Get Learning
Either share the video of Marty acting based on input from the micro:bit or buld the program using the code from the image and video, below, to display to learners.
The first video of Marty, from the presentation, only shows Marty moving: the micro:bit is not shown because the goal is for learners to decide the input and output pairs for Marty and the micro:bit. After each of Marty's action clips, you could pause the video for suggestions for learners as to what each micro:bit input could be.
Learners will need to carry out a couple of steps before they can start using Marty with the micro:bit. This part of the lesson assumes that the network password has already been entered into the configuration part of the iPad app to allow Marty to connect to Wi-Fi. Additionally, each laptop or desktop must have the Scratch link already installed and running. There are user guides to support this. Links are in the additional reading section.
The videos below are in the presentation, to support learners preparing Marty for work with the micro:bit. Feel free to delete the slides and show learners how to do these steps, or set up the devices before the lesson. If you choose not to use the videos in the presentation, you should delete the appropriate slides.
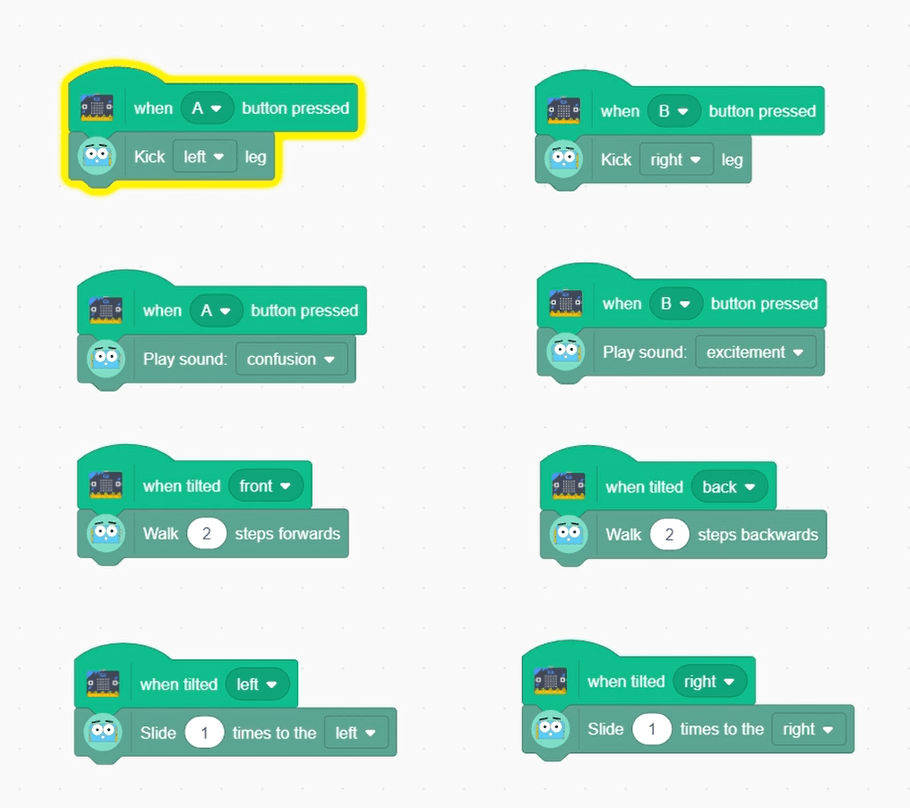
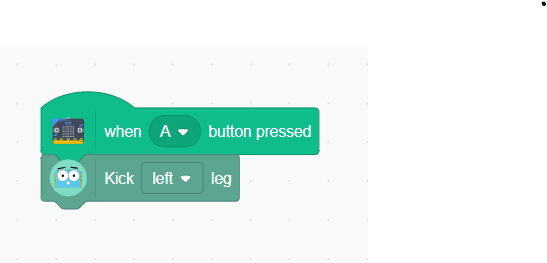
Share an example of one micro:bit block and what this block can do for Marty.
Have learners discuss in groups what input on the micro:bit should go with what output for Marty. Have learners record their ideas in their workbook by writing the Marty outputs with the most suitable micro:bit inputs, in the Bingo square. Each of the inputs and outputs has a number that either corresponds to a die or could be used with a random number generator, so learners need to write the number pairs in each cell; there are different colors in the workbook but it should be enough to stipulate that the input number (micro:bit) always goes first and the output number (Marty's action) always goes second. Learners will notice that the A and B button actions appear twice. This is intentional to limit the movement of the micro:bit to only tilting, rather than tilting and shaking/moving. For the bingo game, there is a list of random numbers generators that can be used to choose the actions, for use with the bingo game.
An alternative to choosing the most appropriate pairings would be for groups to create combinations that don't make sense, just to see what it looks like and for use with the bingo game.
Time for Practice
Have learners build each of their 8 combinations on the workspace in the Web MartyBlocks - this can be taken either from the workbook combinations that make sense or the ones that are a bit sillier. Have groups test their work to ensure that the result is what they expect. Learners will quickly see that the micro:bit is very responsive, they will need to be careful with movements when testing their code.
There is one big difference between the MartyBlocks code from earlier lessons and this one, using the micro:bit. Learners may notice that the green flag is always selected. It is worthwhile asking why this might be the case. Suggestions might include, because the micro:bit is always ready for input; the micro:bit receives input frequently, like a keyboard; it's like the micro:bit inputs are running in a loop, it is always waiting and as soon as an input is detected, an output can occur.
Once all learners are ready, have them consult their workbook bingo page as you select the random numbers for each combination.
Before the first random number combination, decide if the bingo game will be for a line (horizontal, vertical, diagonal) or a full house (all squares ticked).
Random number generator - choose minimum 1 and maximum 8. This will need to run twice for each choice.
Spinner - you need to click on the gear and numbers, and make the minimum 1 and the maximum 8. This will need to run twice for each choice.
Claw number picker - you need to click on the gear and numbers, and make the minimum 1 and the maximum 8. This will need to run twice for each choice.
Eggs, with number inside - you need to click on the gear and numbers, and make the minimum 1 and the maximum 8. This will need to run twice for each choice.
Dice roller - this is set up to have two 8-sided dice ready. There are multiple adds on this page, which you can close before sharing the page with learners.
If the combination of numbers matches one of the pairs learners have on their bingo board, have them click on the code block that displays this combination to display the action via Marty; to keep track of their success, they should also tick the box in their workbook. Learners are trying to achieve the goal set at the beginning of the game. This could be repeated: first game, one horizontal line, second game, one vertical line, or some other combination of goals.
Cool Down
Bring learners back together to discuss the challenges they faced and overcame. Have groups model their creations and explain what is happening, when. Encourage other groups to ask questions to deepen the understanding of the processes.
Take time to have group code displayed to the class, encourage observational questions from peers.
Suggested questions you might ask:
- How did you decide which combinations made the most sense?
- If you chose to make a second bingo sheet, why do you think these choices didn't make the most sense?
- Why do you think the green flag was always on when using the micro:bit blocks?
Carry out any end of lesson routines.
Log off devices and clear everything away.
Extensions & Support
Extend
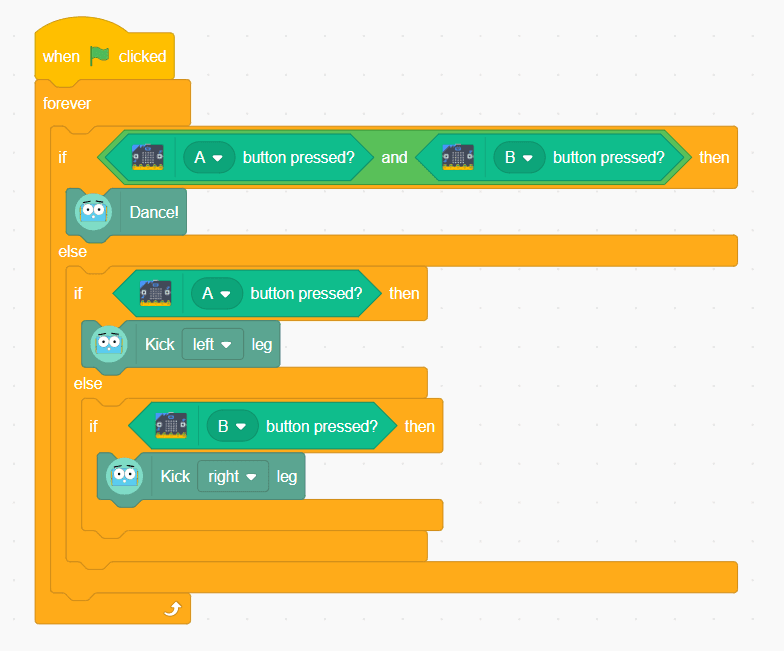
Have learners choose the standard event block to start the program. They will need to either create parallel blocks of code, with individual loops or one big block with a loop and numerous nested conditional (if) statements. The image below is an example of how the A and B button, or the A or B button can produce different results. Alternatively, you could develop a future lesson where this is the core objective. Allow learners time to explore the possible alternatives.
Support
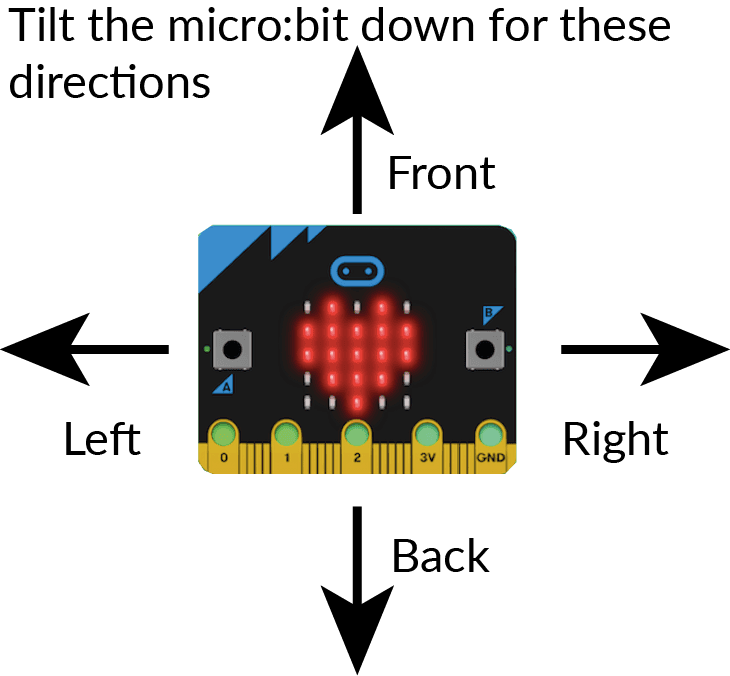
There is an image below, also in the resources section, that reminds learners about directions. Arrows indicate front, left, right and back. The micro:bit needs to be tilted downward in the direction the arrow is pointing for that input.
Additional Reading
- Middle School Technology Applications: Grade 6 to Grade 8
- Technologies: Computing Science
- Literacy & English: Listening and Talking
- Health and Wellbeing: Mental, Emotional, Social and Physical Wellbeing
- Literacy & English: Writing
- Computing, Design and Technology: Design and Technology
- Computing, Design and Technology: Computing
- CSTA Education Standards
- Digital Technologies, Design & technologies: Design & Technologies
- Digital Technologies, Design & technologies: Digital Technologies
- International Society for Technology in Education (ISTE)