


Mathematics - Upper Years - Lesson 2 - Comparing Angles
Lesson Overview
Begin to compare angles in terms of size: how can we tell which angle is bigger or smaller than another? Extend learners' awareness of angles to include categories like acute and obtuse.
- acute, obtuse, right angle, straight angle, vertex arm,
Content Sections
Mathematics - Upper Years - Lesson 2 - Comparing Angles
Lesson Overview
Begin to compare angles in terms of size: how can we tell which angle is bigger or smaller than another? Extend learners' awareness of angles to include categories like acute and obtuse.
- acute, obtuse, right angle, straight angle, vertex arm,
- Awareness of 0, 90 and 180° angles
- Tablet with Bluetooth 4.2+
- Mathematics - Angles
-
- Activity pages
- Marty the Robot V2
- A device with MartyBlocks to show the angles in action
- Extension page
Learning Objectives
- I can compare angles in terms of size.
- I can identify an angle as acute or obtuse.
Pre-Lesson Preparation
Open the Marty the Robot app and build the following piece of code into the workspace:
This code will create an angle with Marty's arms, hold the angle for 5 seconds and create another one.
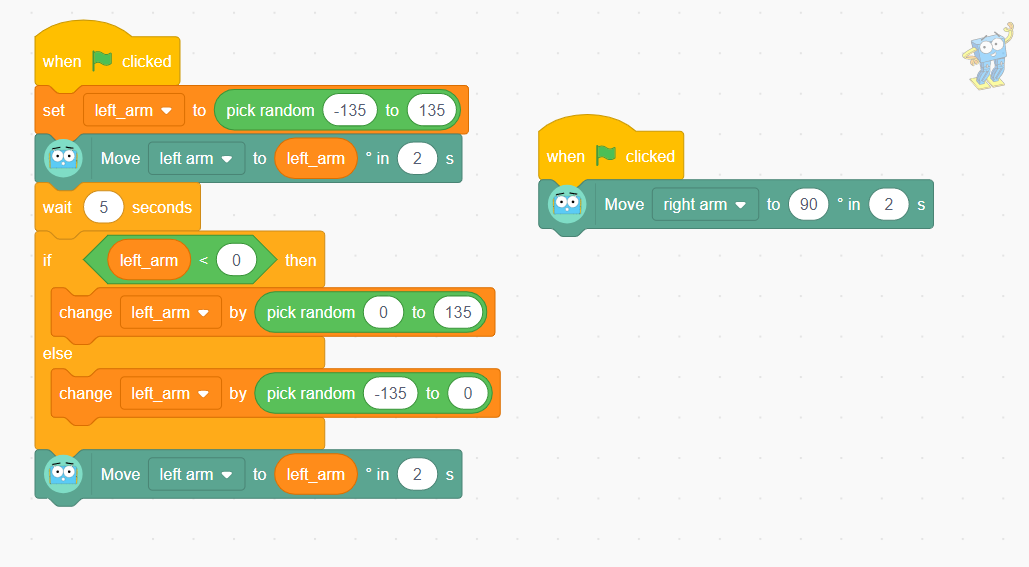
Save this code in the app and give it an appropriate name. Please consult the teacher guide for step-by-step instructions for building it.
Warm-Up
Share with learners the objectives and success criteria for the day's lesson, from slide 2 of the presentation in the educator resource section; perhaps display this before the lesson starts and keep it displayed until another slide is needed.
If you can, take learners outside to find angles in their environment. Remind learners that an angle is where one arm turns away from another at a vertex. Illustrate with your arms held out in front and moving one of them up or down, at the shoulder, while keeping the other straight. Feel free to substii
If going outside isn't an option, there are examples of tree angles in the presentation on slide 3. If you go outside, feel free to not use this slide.
Encourage learners to see if they can spot examples where two arms meet at a vertex and form an angle. If the examples are able to be easily moved, collect them together for later comparison. If the resources are available, use devices to photograph the found angles for later comparison or take out notebooks to sketch the discovered angles.
The reason for using natural objects for angle discovery is because of the tendency to have mainly 90° angles in a built environment.
Get Learning
If you were able to, collect the natural examples of angles and present them with the same orientation: one arm of the angle is a continuous line. The image below shows a possible arrangement. If you were unable to go outside, slide 3 of the presentation shows the collection of angles, pictured below but they can be moved about when not in presentation mode.

If you were not able to collect the natural angles, but were able to take photos or sketches, display these examples in an open area in the classroom to compare the various angle sizes. Have a group discovery where together you order the created angles from least to greatest or vice versa.
Here are some ideas for information you could share and questions you could ask.
- "what do you look at to decide which angle is more?"
- "what is the part of the angle called where the two arms meet?"
- "because the turn is more for the arms of these sticks - point to those sticks - the angle is greater" and vice versa for sticks with a smaller angle.
It would be best to have a range of angles from small acute to big obtuse.
Share with learners, "Already, we have seen angles that are 90°, which are called right angles and 180°, which are called straight angles. There are lots of angles that are between them and angles that are less than 90°. We have names for them."
Display the last slide of the presentation to show the definitions for acute and obtuse. Have learners think of items in their lives that could be described with the provided definitions. The presentation displays a sharpened pencil as having an acute angle, and a dull pencil as having an obtuse one.
Take the organised angles, either from the presentation, sketches or from what was gathered and arrange them into one of the two groups: acute or obtuse angles. Draw attention to any angles that were found that were straight or right. Ask learners what they think they should do with them. Draw attention back to the definition:
- making an angle between 0° and 90°
- making an angle between 90° and 180°
- neither 90° and 180° angles meet this criteria; they will need their own category: right or straight angles
Challenge learners to reproduce each of the angles being using their arms, with their shoulders being the vertex. Model this for learners first:
- Turn to the side so that learners will see your shoulder.
- Move one arm out in front of yourself to be the starting arm
- Slowly move the other arm to the position so that it is similar to one of the sticks either pictured on-screen or displayed on the ground. Speak as you are moving the arm away from 0 degrees to verbalise how big it is getting or act in surprise at how small it is because it didn't take long to move the second arm from the first.
Time for Practice
If you have already used the What is an Angle lesson, remind learners that Marty is an expert angle maker; if you haven't had the opportunity, introduce Marty with this skill. Inform learners that Marty is very skilled at making angles of all sizes and would like to help the class get more confident at comparing the size of angles. There is a small script to get Marty warmed up for displaying angles in the teacher guide.
Tell learners that they need to get a partner. One person will copy Marty's first angle and one person will copy Marty's second angle. Using the longer program that you set up prior to the lesson:
- press the green flag on the MartyBlocks program you created
- Marty will move the right and left arm to create an angle
- have one partner copy this
- Marty will pause for 5 seconds
- Marty will create a second angle
- Learners need to decide which angle is greater or less
Repeat this process until you feel learners are quickly able to identify the greater/lesser of the two angles. If there is a group of three, press the green flag a second time and then press the stop button after Marty creates the first angle.
Share with learners the practice activity in the workbook, in the resources section, that shows a collection of Martys creating angles with their two arms. For each question, learners need to identify which angle is the greater or lesser of the two. On the page, some of the initial Martys have angle arms over Marty's arms. Encourage learners to indicate this on their pages to better identify where the angle is.
The second part of the activity sheet challenges learners to: think about the angle created by several objects in the environment, make a sketch of the angle they think it would be, organise the sketches in terms of angle size: acute or obtuse.
Cool Down
Bring learners back together to discuss the challenges they faced and overcame. Have learners share any strategies they used to identify which angle was greater from what Marty displayed. If confident, have learners model some of the example questions and say what angle they thought about when completing the activity.
Suggested questions you might ask:
- What is a good way to describe an acute angle?
- What is a good way to describe an obtuse angle?
- How did you compare the angles when the arms pointed in different directions?
Carry out any end of lesson routines.
Extensions & Support
Extend
Challenge learners to complete the extension activity linking an analog clock to an angle. The extension activity displays a range of digital clock times, which learners need to draw on an analog clock face and categorize as either acute, obtuse, or right angles. The only right angles are 9:00 and 3:00 to avoid confusion with the minute hand moving as the hour progresses.
Learners could draw the clock hands or picture them in their heads, but they need to order the angles from least to greatest and label them as acute or obtuse.
Support
Encourage learners to model each of the photos of Marty from the activity page. Letting learners experience how Marty looks will help them to decide how much of a turn has been made between the two arms.
For learners still a bit puzzled by some of the examples, show how you can move either your own arms and maintain the angle of turn or do so with Marty with the code block detailed in the teacher guide.
- Mathematics: Measurement and Geometry – Geometric reasoning
- CSTA Education Standards
- Mathematics KS2: Geometry – properties of shapes
- Mathematics:
- Literacy & English: Listening and Talking
- Health and Wellbeing: Mental, Emotional, Social and Physical Wellbeing
- Numeracy: Shape, Position and Movement
- Elementary Math: Knowledge and Skills